Create and set up a community
How to create one, what's in each group of the Settings menu, who on the team sees what, and how to change the address or name, hand over the community or pause it.
Watch the lesson
Creating a community takes a few minutes. After that, everything is adjusted in Settings, the gear icon to the right of the tabs, which only the team sees.
Create
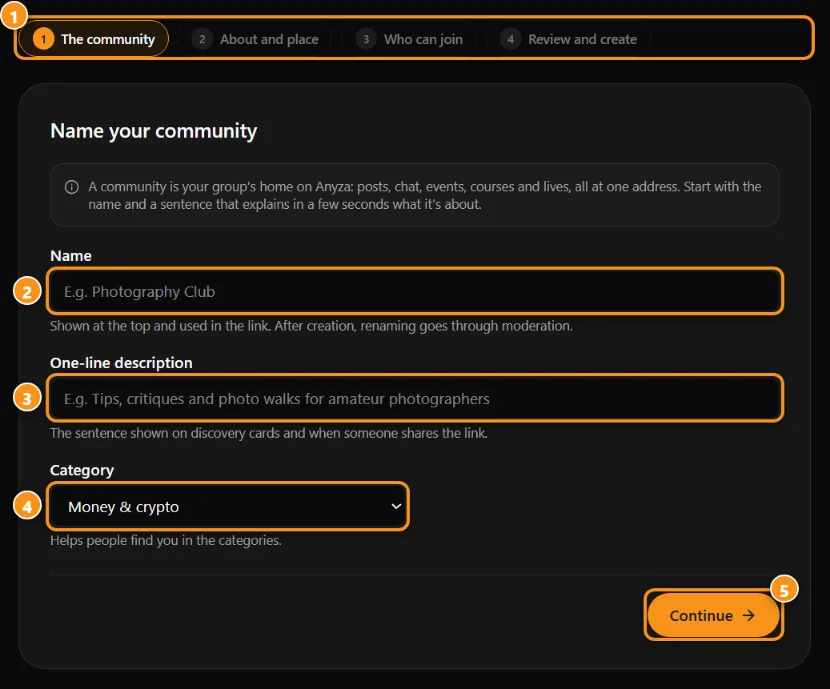
1 the 4 steps · 2 name · 3 one-line description · 4 category · 5 Continue
At the top of the Club, tap Create a community. There are four short steps, and you can go back at any time without losing anything:
- The community: Name (at least 3 characters, no emoji; it becomes the link), One-line description (the sentence on discovery cards) and Category.
- About and place: About (what is it, who is it for) (AI can help you write it), Keywords (up to 10; AI suggests some), Main language and, if the community is about a city or region, Country (optional) (2-letter code) and City (optional).
- Who can join: Public (anyone joins with one click and reads right away; 1 credit a day) or Private (shows up in search, but the content only opens for people you approve; 2 credits a day). Also tick Hidden — link only if you want it kept out of the home page, search, categories and Google.
- Review and create: check everything and tap Create community.
After creating, you go straight to the settings. Anyza moderation takes a quick look: most of the time the community goes live right away. It starts with the topics "Geral" (general) and "Avisos" (announcements, where only the team posts) and the chat room "geral". You can change all of this later.
To create a community you need a confirmed email and a credit balance. Each account can have up to 10 communities. Each community uses the owner's credits: public 1 a day, private 2. Every account starts with 1,000 welcome credits. See Credit usage.
The Settings menu
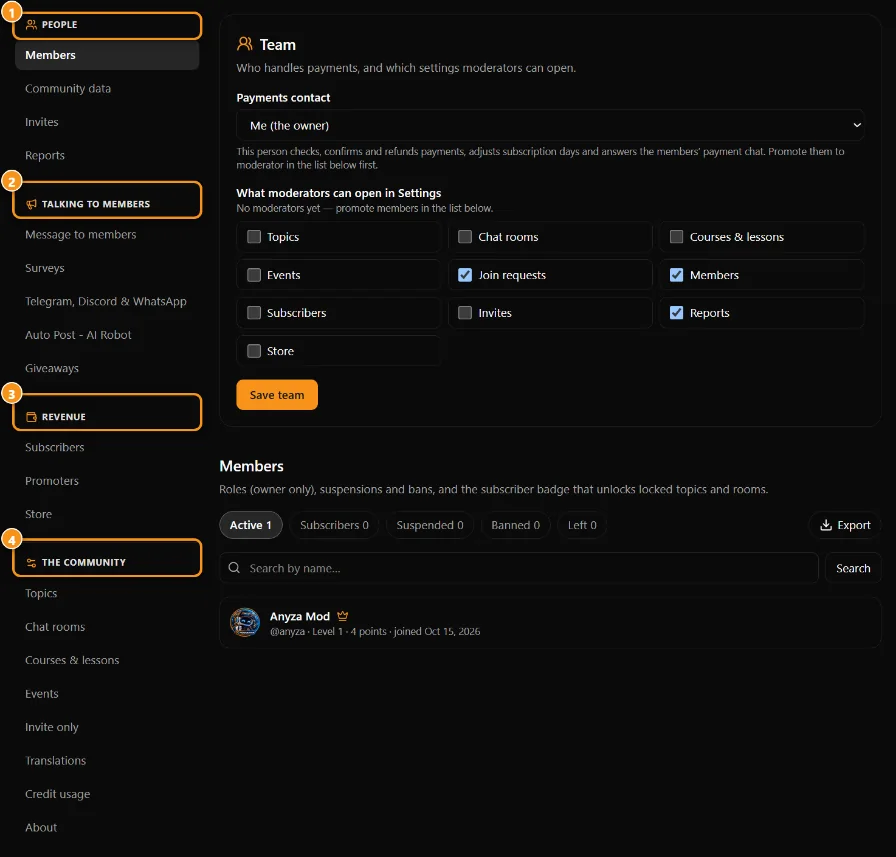
1 People · 2 Talking to members · 3 Revenue · 4 The community
The menu is split into four groups. Day-to-day things come first; the community setup, which you touch less often, comes last.
People
- Members: search, roles (admin or moderator; up to 5 admins), suspensions by days, bans, the subscriber badge and Export the list. Only the owner changes roles.
- Join requests: approve or decline people who asked to join. It shows in private communities (or if a request is left from when it was private).
- Invites: a link that lets people in directly, even into a private community. You set how many uses and for how many days it's valid. See Joining a community, invites and Share.
- Reports: what members reported inside the community. You never see who reported. After 48 h without an answer, the reporter can escalate the case to Anyza.
Talking to members
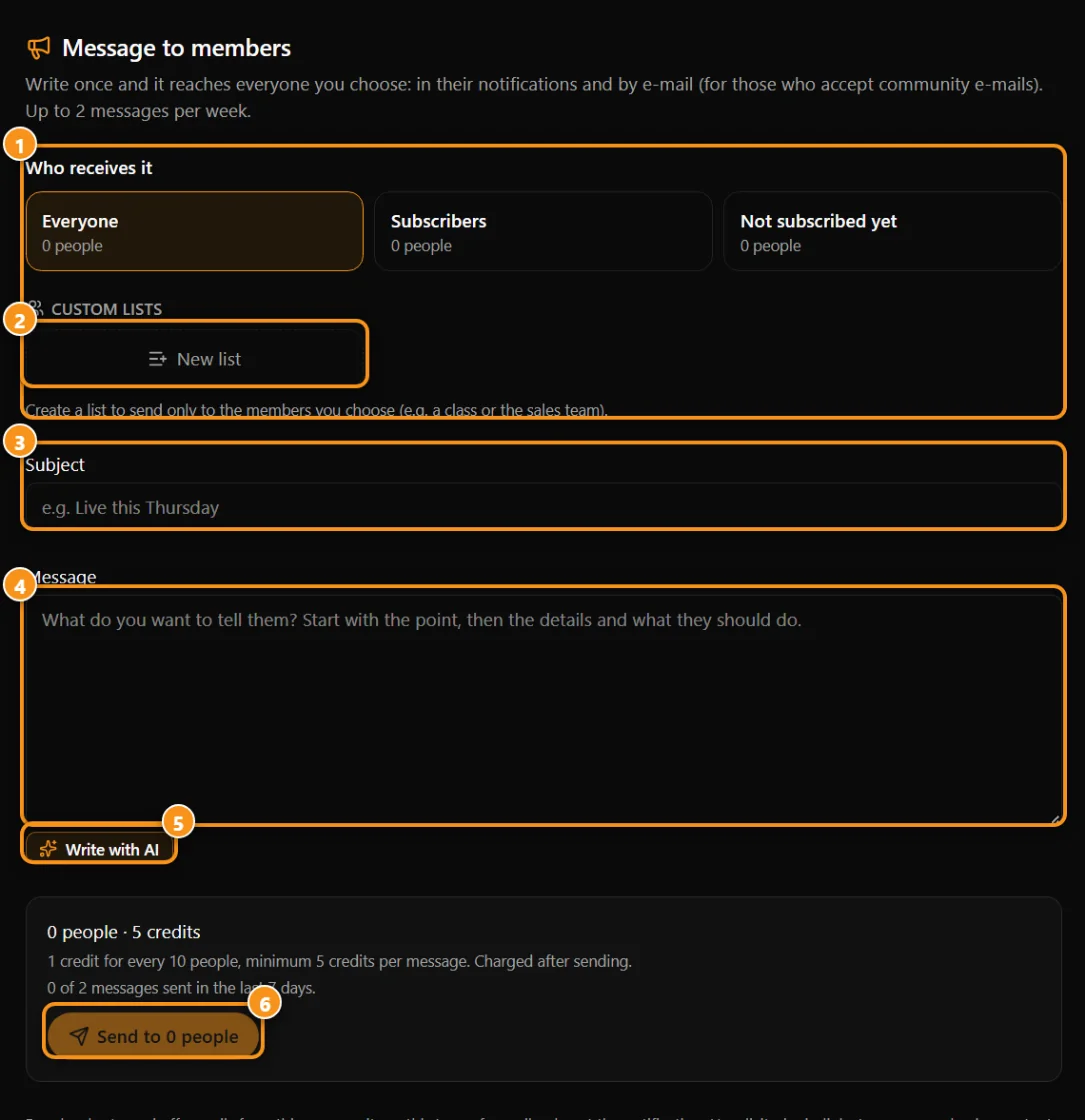
1 who receives it · 2 your own lists · 3 subject · 4 message · 5 write with AI · 6 send (shows the cost)
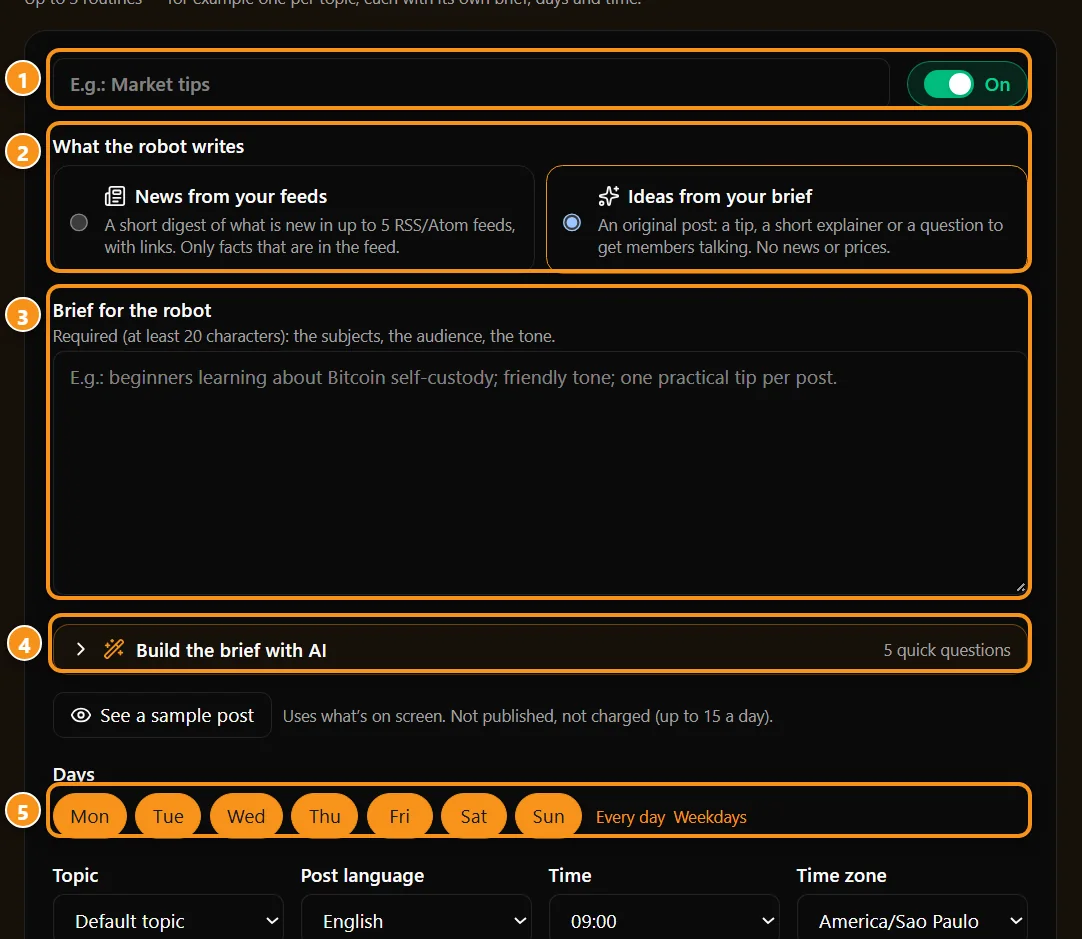
1 name and on/off · 2 news from your feeds or ideas from your brief · 3 the brief · 4 build the brief with AI · 5 posting days
- Message to members: a notice in the bell and by email to all members, subscribers only, non-subscribers or one of your lists. It costs 1 credit per 10 people (minimum 5), with a limit of 2 messages a week. Right below is the Automatic email summary: daily, weekly or monthly, with what's new in the topics, events and lessons you choose. It only goes out when there's something new, costs the same as a message and doesn't count toward the 2-a-week limit. Owner and admins only.
- Telegram, Discord & WhatsApp: the Anyza bot posts your news and runs the members-only group. Owner and admins only. See Telegram, Discord and WhatsApp in your community.
- Auto Post - AI Robot: the robot posts on the days and at the time you set, in your name. It writes a digest of up to 5 RSS/Atom feeds or an original post from your brief, in the language you choose. You can also turn on Direct post, so another AI or script can post through the API. Each robot post uses 5 credits, with a limit of 3 a day. Only the owner manages the robot.
- Giveaways: create and follow giveaways (owner and admins). See Giveaways.
Revenue
- Subscribers: the subscriber list, Subscription plans (up to 3), Payments received and payment Conversations with members. Right below in the menu are Promoters and, when there are any, Receipts. See Subscriptions and Owner payouts.
- Store: choose up to 20 of your Market listings for the Store tab. Three of them, drawn at random, appear on the community's main page.
The community
- Topics: up to 20. Each one sets Who posts, the Access (all members, subscribers only, staff only or read only), the minimum level and whether it Allows short videos.
- Chat rooms: who can enter and talk, minimum level and slow mode. Here the owner or an admin can also turn off the whole chat: the Chat tab disappears, and rooms and messages are kept.
- Courses & lessons and Events: see Courses and lessons, Certificates and public course pages and Events, lives and tickets.
- Invite only: topics, rooms, events, videos and file folders for chosen members only. See Invite only.
- Translations: review and fix automatic translations. It shows for the owner and admins when auto-translation is on. See Automatic translation.
- Credit usage: your balance and how much each community uses. See Credit usage.
- About: everything that presents the community (see below).
Videos and files are uploaded in the Videos and Files tabs themselves. See Video library and Files library.
What's in Settings → About
- Cover image: 1600 × 500 px recommended. After uploading, click the point that must stay visible. Or use Suggest a cover with AI (a few free, then 5 credits per cover, up to 10 a day).
- Gallery (up to 12 images), YouTube video (About page) and the welcome video from the library.
- Rules, Join questions (private community) (up to 3) and Level names (1 to 9). There are ready-made templates with Use a template and Suggest names.
- Links to your website and social profiles (YouTube, Instagram, Telegram, X, Discord).
- Community app: the name and icon members see when they install it on their home screen. See Community app, map, groups and widgets.
- The auto-translation languages, the Clips rules (Clips) and the Members map on switch.
- Promote the community on your website: a shortcut to the widgets (public communities only).
- Hidden community: with Hide, it disappears from the home page, search, categories and Google, but the page stays live for anyone with the link. Make visible undoes it.
- Community address and name change (see below).
- At the end, the Owner only area: pause, hand over and close the community.
Levels and points
Members earn points by taking part (posts, short videos, comments, likes received, completed lessons and courses, referrals, days as a subscriber, 7 days in a row of visits) and level up from 1 to 9. You name each level in About and can require a minimum level for topics and rooms, to reward people who take part. The How to earn points table is on the Ranking tab.
Team
The owner names admins (up to 5) and moderators in Members. In the same place, in the Team panel, the owner chooses:
- the Payments contact, who checks, confirms and refunds payments and answers the members' payment chat;
- What moderators can open in Settings. "About" and "Invite only" always show for them.
Admins see almost everything. Some parts are owner only: roles, the robot, the address, and pausing, handing over and closing the community.
Change the address
In Settings → About → Community address, owner only:
- Each change costs 100 purchased credits (bonus credits don't count).
- After a change, the next one is only possible 7 days later.
- At least 4 characters: lowercase letters, numbers and hyphens. Some addresses are reserved by Anyza.
- Old links (WhatsApp, Telegram, Google, installed app) lead to the new address automatically, and the old one stays reserved so nobody else can take it.
Change the name
Tap Request a name change. The request goes to moderation, and 100 credits are reserved: they come back if moderation declines or you cancel. While the community is still waiting for its first approval, you can edit the name directly.
Hand over, pause and close
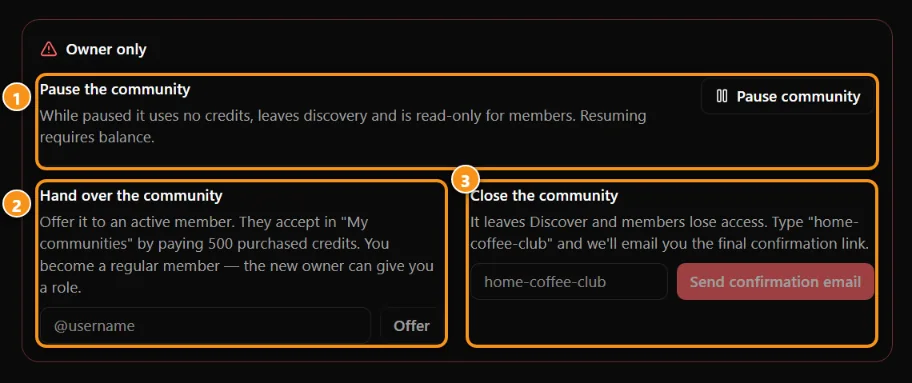
1 pause · 2 hand over · 3 close
In the Owner only area at the end of About:
- Pause the community: while paused it uses no credits, leaves discovery and is read-only for members. Resuming requires a balance.
- Hand over the community: offer it to an active member by @username. They accept in My communities by paying 500 purchased credits and start paying for its usage. You become a regular member, and the new owner can give you a role.
- Close the community: type its address and we email you a confirmation link that's valid for 1 hour. It only closes when you open the link and confirm. Once closed, it leaves Discover and members lose access.
If your credit balance runs out, the panel locks (only Credit usage opens) until you top up, but members keep their access. After 90 days without a balance, your communities pause.
Tips
- Start with a few topics and use "Avisos" for team announcements.
- Turn on a weekly Automatic email summary: it brings back people who don't open the Club every day.
- Before promoting the community, fill in the cover, rules and Community app, and send the install link in your first message.
Updated 2026-10-15